1 - Install bracket on back of Dash. Use included Philips screwdriver and 4 screws. Hand tighten screws.
2 - Assemble Power wire in three steps: First, press the fuse tap power wire terminal into the power module wire terminal as shown in photo 2. Then slide the clear insulation over the terminals as shown in 3 and 4.

3 - Remove the T25 torx screw from the kick panel above the left foot of the driver using the included driver tool. Disconnect front edge of Rivian kick panel (over driver's feet) and pull it down (do not need to completely remove the panel) to expose Rivian fuse panel. Let the panel hang down for now.
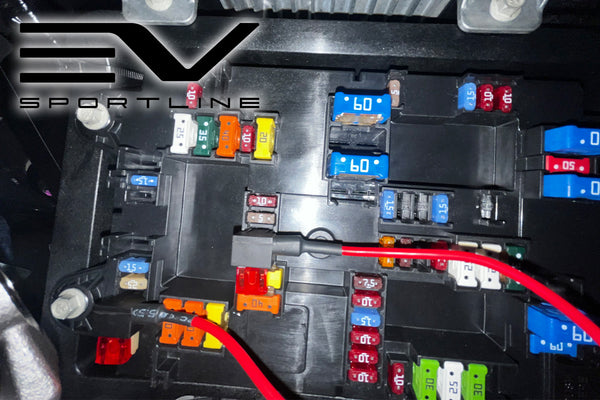
4 - Identify the 10 amp fuse in the Rivian fuse panel (shown in photo below - located above the kick panel opened in step 3). Remove this 10amp Rivian fuse using the fuse puller included with the fit. The fuse puller is like a small tweezer type pliers tool. It clips on the edge of the fuse. Then pinch the tool to keep it holding the fuse, and pull the fuse straight out. The removed fuse will be used in step 5.

5 - Install (press into fuse tap) the removed Rivian fuse into the fuse tap on the power harness. Also install the included (in power kit bag) fuse into the second spot on the fuse tap as shown. It doesn't matter which slot gets witch fuse, they are both 10 amp fuses and can be interchanged. The fuse tap will have the two 10amp fuses installed (pressed into place) when step 5 is complete.
6 - Press the assembled fuse tap into the Rivian fuse panel, in the fuse location where the Rivian fuse was removed in step 4.

7 - Install ground strap (round eyelet on black wire of power module) on ground stud in left area as shown. Install included nut to secure ground strap on ground stud. Hand tighten nut to snug, doesn't need to be excessively tightened. 13mm socket needed.

8 - On the dash pad over the left center of the main Rivian center screen, gently lift the edge of the dash pad with fingers (it pulls up) to expose a gap between woodgrain dash panel and upper dash pad. The entire upper dash panel is composed of a highly pliable plastic foam core with a synthetic faux leather wrap and is fairly flexible. When dash pad is held up, carefully slide a plastic trim pry tool or flat edge screw driver into the gap to hold the pad up temporarily. Repeat the process on about 8-10 inches to the right, over the right edge of the center screen. The inserted plastic trim pry tools (or screwdrivers) will give you a gap to slide the screen bracket into place.
9 - Carefully slide the screen and bracket assembly into the 'gap', and tilt the screen and lift the screen up, while pushing it in toward the dash to get the bracket slipped into place. Once the back of the bracket is touching the front edge of the upper dash pad, it is in place. Hold the edge of the dash pad up with fingers, and carefully remove the screwdriver. Repeat on other side with second screwdriver. The geometric shape of the bracket matches the edge of the Rivian dash panel and will secure the bracket without any further effort.
10 - Center the Smart Screen as desired. It will slide a bit to the left to right with some force.
11 - Install USB-C power wire into Smart Screen Dash. There are countless acceptable ways to route the wire, but we'll give you our recommended routing. Route the power wire under the Smart Dash Screen along the top edge of the Rivian center screen and then down along the left side (or tucked behind the center screen left edge) of the center screen, down to the foot well.
12 - Under the dash and above the driver feet, the power wire can be zip tied in place around the small plastic trim panel which has holes in it for HVAC vents. The wire can be routed up behind the panel and across to the fuse panel. The wire can be zip tied out of the way of the steering linkage and brake pedal as needed.

13 - Under the fuse panel and above the kick panel, wrap up the excess power module wire and zip tire it together and out of the way of the steering linkage and brake pedal. The kick panel we loosened will easily hold and support the wrapped up wire. Press the kick panel back into position, and replace the T25 torx screw.

14 - The Smart Screen Dash is now installed! Follow setup instructions on the Smart Screen to pair the unit with your phone.

Any questions? Please contact our Customer Support team HERE
Check for Firmware updates HERE
Using the Smart Screen and our MagSafe Phone mount? Use these two fuse locations - 48 and 62 (allows using both power supplies)