Team 1EV Smart Dash Screen Firmware Updates
January 29th, 2024
Update: Airplay for iOS 17.2.0 or newer (Fixes WiFi connection issue). If you do not use AirPlay, there is no other reason to update the firmware.
Requirements:
- MicroSD XC card (16GB or larger), suitable card reader
- Windows PC (will not work on Mac)
Firmware Update: M35_CPAPAAMC Version 20230904 or M61_CPAPAAMC 20240123
How to Check Firmware
On your Smart Screen, go to Settings then click on Firmware.

Instructions
1. On your PC, download our Smart Screen firmware update file. Right click on the zipped folder and select "Extract All...", then click "Extract".
4. Scroll down and locate the application named "PhoenixCard.exe" and open it.
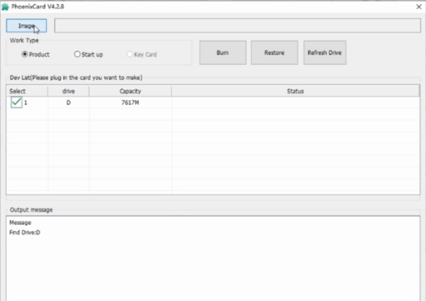
5. Ensure the MicroSD card is the drive selected in the device list and then click the image button in the top left of the window to select the new firmware file.
6. Browse to the location of the file named: “T86BA_PND_1026_1600X600M35_CPAPAAMC_20240123_V1_MS_GLYHWIFIMC 2.img” and select it. The path of the file will be displayed in the top bar.

7. Select “product” as the work type and click burn.

8. Once the progress bar is complete, the new firmware is burned to the MicroSD card and you can close the program window.

9. Set phone to Airplane mode and turn off WiFi and Bluetooth (to prevent Smart Screen from connecting CarPlay while updating Smart Screen).
10. Power down the Smart Screen by disconnecting the USB-C power wire then place the MicroSD card in the slot on the side of the screen.
11. Plug the USB-C power wire back into Smart Screen and a progress bar will appear showing that the firmware flash has started. This may take a minute or two to complete.
12. When the progress bar is full the Smart Screen display will turn off illustrating that the process is complete.
13. Once the firmware update is fully complete, remove the MicroSD card first, then unplug the USB-C Power for 5 seconds, then re-plug in the USB-C power to restart the Smart Screen. You have successfully installed the new firmware.
14. Next, unplug USB-C power to Smart Screen.
15. Connect MicroSD card to your computer.
16. Format the MicroSD card by right clicking the card in file explorer and selecting "Format...", then selecting "ExFat" from the drop down. Once your settings match, select "Start" which will delete all existing files on the MicroSD card.


17. Copy the "boot_logo.jpg" file to MicroSD card.
18. Eject the MicroSD card from computer and insert the MicroSD into the slot on the right side of Smart Screen.
19. Plug the USB-C power into Smart Screen. Let device boot up, it will automatically update. Wait for 'update completed' to show on Smart Screen.
20. Unplug USB-C power from Smart Screen. Remove Micro SD card.
21. Plug USB-C power to Smart Screen, update complete!
22. Turn off airplane mode on your phone!